
How to Draw a Treadmill: A Beginner-Friendly Guide
Are you wondering how to draw a treadmill but not sure where to start? Whether you’re a beginner learning to sketch or just exploring how machines work, drawing a treadmill is a great exercise. Treadmills might look complex at first glance, but they’re actually made up of simple geometric shapes that are easy to break down.
In this guide, we’ll walk you through how to draw a treadmill step by step — no fancy tools needed. Just grab a pencil, some paper, and let’s get started!
Why Drawing a Treadmill is Easier Than You Think
1. Simple Shapes, Big Results
When learning how to draw a treadmill, it helps to realize that most of its parts are made up of rectangles and cylinders. From the base to the handlebars, it’s all about combining these basic forms.
2. No Complicated Angles
You don’t need to worry about perspective drawing if you’re going for a 2D side view. This view keeps things simple and is perfect for beginners.
3. Recognizable Features
Most people are familiar with treadmills – they’ve either seen one or used one at the gym. This makes it easier to visualize what you’re drawing.
Step-by-Step: How to Draw a Treadmill
Let’s get into the fun part — the actual drawing! Follow this guide to create a simple yet realistic treadmill sketch.
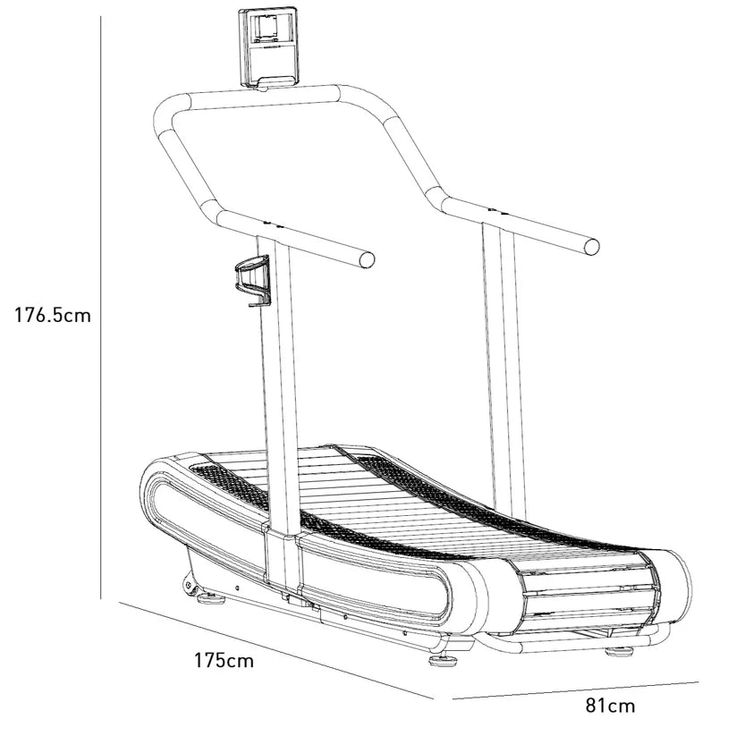
Step 1: Draw the Base
Start with a large horizontal rectangle. This will serve as the main platform where the running belt sits.
Step 2: Add the Support Bars
Next, draw two vertical rectangles at the front corners of the base. These are the treadmill’s upright support bars.
Step 3: Create the Console Area
Connect the tops of the support bars with a horizontal line. Inside that area, draw a smaller rectangle — this will be the control console where you’d normally see speed, time, and distance stats.
Step 4: Draw the Handrails
Add two small semi-circles or curves on each side of the upright bars to represent the handgrips.
Step 5: Add the Motor Housing
At the back of the base, draw a smaller rectangular shape — this is the motor cover that powers the belt.
Step 6: Sketch the Running Belt
Draw a large rectangle within the base platform. Add some light horizontal lines or grooves to show the texture of the belt.
Step 7: Add the Rollers
Now draw two small cylinders at the front and back of the treadmill. These represent the rollers that help move the belt.
Step 8: Include Optional Features
Want to add more detail? You can draw buttons on the console, a safety clip, or even cup holders on the handlebars.
Tips for Improving Your Treadmill Drawing
Even if your goal is just a simple sketch, here are some pro tips to take it to the next level:
-
Use shading to give the drawing a more 3D effect.
-
Practice proportions so parts like the console and belt look realistic in size.
-
Try drawing a stick figure on the treadmill to show scale and bring your drawing to life.
-
Use grey, black, and silver colors for a more realistic treadmill finish.
Benefits of Drawing a Treadmill
You might be asking yourself — why bother drawing a treadmill? Well, you’d be surprised at how many skills you build in the process!
1. Improved Observation Skills
Learning how to draw a treadmill means observing its shapes and components more carefully. This sharpens your visual focus.
2. Understanding Mechanical Structure
As you break it down into parts like the motor housing, console, and rollers, you get a deeper understanding of how it all works together.
3. Motor Skill Development
Drawing helps improve your hand-eye coordination, especially when using fine lines or small details.
4. Creative Expression
Even though treadmills are functional, you can still get creative! Add stylized lines, shading, or background elements to make it your own.
5. Memory Retention
When you draw something from scratch, you remember it better. This can be helpful for students or hobbyists learning about mechanical objects.
Key Parts to Include When Drawing a Treadmill
If you want your sketch to really pop, make sure to include these six key treadmill components:
-
Console Display – Houses controls and stats like speed, distance, and calories burned.
-
Handrails – Provide safety and support, often with heart-rate sensors.
-
Running Belt – The surface you walk or run on; usually textured for grip.
-
Motor Housing – Contains the motor that powers the belt.
-
Rollers – Located at the front and back, these guide the belt’s motion.
-
Incline Mechanism – Allows the treadmill’s surface to tilt for more intense workouts.
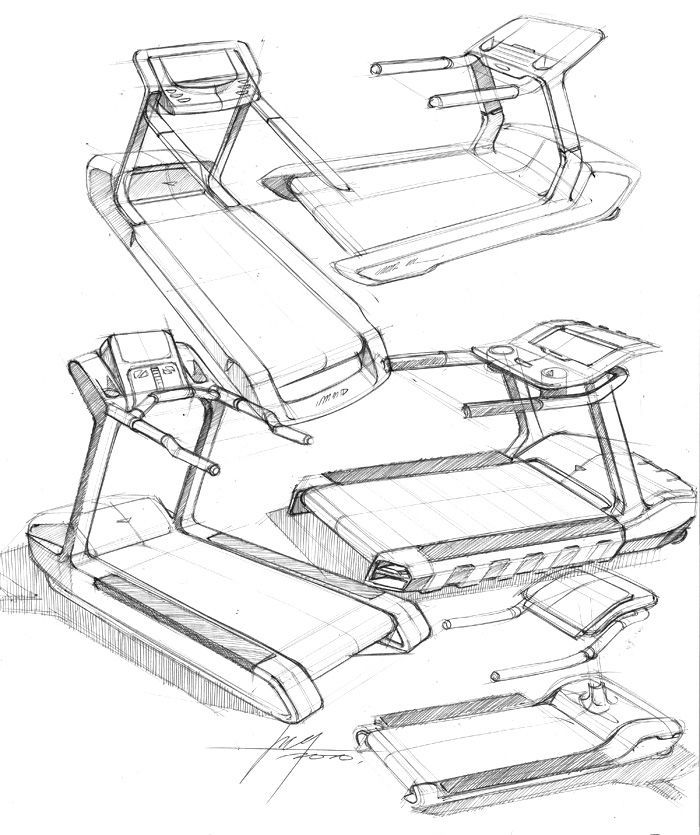
Bonus: Practice Drawing in Different Views
Once you’ve mastered the side view, try sketching the treadmill from the front or back. This introduces some light perspective, which is a great skill to develop. You can also experiment with 3D views for more realism.
Final Thoughts: Drawing a Treadmill is a Great Beginner Exercise
Learning how to draw a treadmill is a great way to improve your drawing skills while understanding how machines work. By starting with simple geometric shapes and building up layer by layer, you can create a detailed and realistic treadmill sketch in no time.
Don’t worry about making it perfect — just practice, have fun, and let your creativity flow!
FAQ: How to Draw a Treadmill
Q: Is it hard to draw a treadmill?
Not at all! If you break it down into rectangles and cylinders, it’s a very beginner-friendly drawing.
Q: Do I need special tools?
Nope — just a pencil, eraser, and paper are enough to get started.
Q: Can I color my treadmill drawing?
Absolutely. Use greys, blacks, and silvers for a realistic look or go wild with your own color scheme.
Read More:
👉 Does using a treadmill make your bum smaller?